

Diamond Painting: What is it? Here's the 2021 guide for beginners
DIAMOND PAINTING: WHAT IS IT?
Diamond painting can be described as a craft hobby. Think of it as an integration between Paint by Numbers and Cross Stitch.
Diamond painting started in 2015. It was developed to be a more therapeutic version of Cross Stitch - a faster and easier version.
Diamond painting allows you to apply small "diamonds" of resin onto a DMC-coated adhesive canvas to create brighter mosaic paintings.
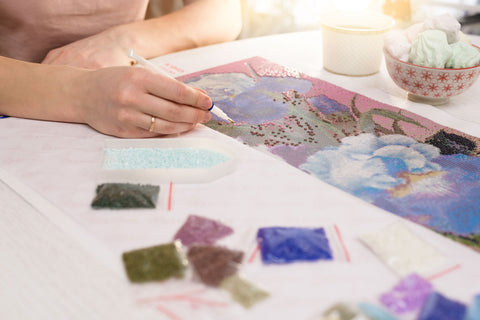
GETTING STARTED WITH DIAMOND PAINTING

NAVIGATION INSTRUCTIONS
- Remove all items from the packaging.
- The canvas should be laid out on a flat and clean surface.
- To start, select a color diamond.
- Pour the diamonds into the tray (included) to simplify the picking.
- The tip of the applicator should be dipped in the wax. This will allow you to pick up the diamonds effortlessly. (Note - the wax is included with some kits, tweezers are included with others.)
- The tip of the applicator should be placed on the rounded side of the diamond.
- The plastic film of the applicator should be carefully peeled off. The diamond should then be pressed onto the corresponding symbol.
- This process should be repeated until you are finished!
WHAT SEPARATES A SQUARE DIAMOND FROM A ROUND ONE?
When it comes to diamond painting, you will sometimes come across terms such as "round drill" and "square drill". The word "drill" is just a substitute word to describe a diamond.
When talking about square diamonds and round diamonds, we are comparing the shapes of the diamonds to each other.
If you are trying to make a choice between a round and square shape, you should keep in mind that there is no correct answer. Your goal should be to choose a shape that you find beautiful.
SQUARE DIAMONDS

You will be able to create a more complete painting
Square diamonds appear "cleaner" compared to round diamonds. They align more easily with each other, creating a complete mosaic appearance when viewed from afar.
The square diamonds "snap" together satisfyingly
Little things like this can go a long way! When you start the filling process, the "snap" you'll hear as these pieces come together will be quite satisfying.
ROUND DIAMONDS

Picking up diamonds and applying them will be faster and easier!
Round diamonds adhere much better to diamond pens, making the transition almost seamless.
The finished painting may look less "complete"
Keeping in mind the shapes of the diamonds, the spaces between the diamonds may be more visible when looking at the painting up close.
DIFFERENT TECHNIQUES FOR DIAMOND PAINTING

You might want to change things up after a while.Various diamond painting techniques have been developed by our community. The strategies to use them couldn't be easier!
THE CHECKERBOARD APPROACH
Alternating black and white squares can be applied to areas containing large amounts of a certain color. Many gaps will thus be filled. When everything comes together, the finished piece will be fascinating.
START FROM THE BOTTOM
The best things should be saved for last. This approach involves starting with the color of which you have the least diamonds. Round things off with the color you have in abundance. Things will become easier as you progress. Several similar colors can be used simultaneously if you have a multi-head diamond pen.
THE INDIVIDUAL APPROACH
Although this approach does not require much explanation, it is worth mentioning. Simply move from one side of the canvas to the other using a single color per movement. However, remember that some easily exposed areas may seem less sticky over time. Nevertheless, all empty spaces will be filled with this approach. For some, the process may be more satisfying than moving from one row to another.
SUGGESTION: if some areas lose their stickiness due to exposure to air, the area can be dabbed with a baby wipe or a damp towel.
THE FIRM GROUND APPROACH
Large blocks containing similar colors should be divided into small "plots" that can be "harvested" on an individual basis. Each rectangle should be wide enough for 3 to 5 diamonds to be placed using the wide end of the diamond pen.
Each kit will include everything you need to get started!
- Wax pad (with which you can pick up diamonds).
- A diamond pen.
- Colored diamonds (separated by labeled bags).
- Canvas (pre-printed) with a design chart (includes pre-applied adhesive).
IF THE CANVAS DISPLAYS WITH CREASES, WHAT SHOULD I DO?
Many kits are shipped from overseas. Our canvases are securely packed. From time to time, however, creases may appear on the canvas.What measures can you take to remove them?
- Stick your canvas under a mattress - leave the canvas there overnight.
- Place heavy books directly on your canvas - by applying weights to the canvas using heavy books and leaving them there for a few days, you will flatten the creases.
- Craft knives can be used to cut the creases - if some creases are too stubborn to come out, use X-Acto knives or a tool like them to release the trapped air between your canvas and the adhesive layer attached to it.
FRAMING A DIAMOND PAINTING

Oraloa can provide you with a natural wood stretcher bar that you can add to your finished canvas.
Note - the beads must be fixed with Mod Podge or a similar paste, according to the steps illustrated in this video.Contact us for more comprehensive instructions.
USEFUL TIPS AND ADVICE
- The canvas will come wrapped in parchment paper or plastic film upon arrival (to preserve the stickiness). The plastic film should not be removed all at once. Rather, the plastic should be peeled off slowly as you work your way up.
- Egg cartons can be used for organizing the diamonds. The process is simple and inexpensive.
- Stick or paste the diamonds next to the symbol indicated on your canvas. The diamonds can be referenced easily whenever you need a quick glance.
- Baby wipes can be used to make certain areas sticky again. If a certain area of the canvas loses its stickiness, use a baby wipe to dab that area.This technique can also be used to remove pet hair or papers from your canvas.
The Oraloa family welcomes you!
If you have any questions, send us a message by email at info@oraloa.com ou or contact us on Facebook.
Do you have any diamond painting suggestions to share? We would love to hear about them below.
Emy Collins for Oraloa ©


